关于导航模式的view controller,这个例子是一个很有用的。下面是对这个例子的详细分析。
1. MainViewController类
程序运行的第一个界面如下:
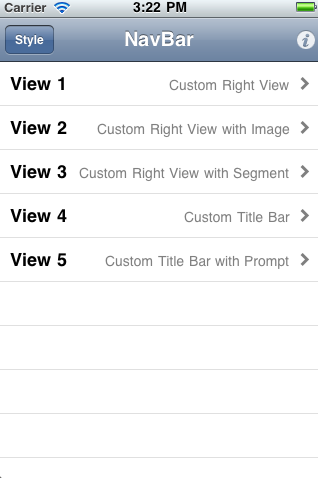
一般情况下,导航模式的工程模板会隐含生成一个table view controller,亦即导航的主view是一个tableview,当然这个不是必须的,如果你希望生成一个主view不是tableview的也是可以的,你必须自己使用代码写,本文的后面会提到这个。
在XCode4.2中,如果你希望生成导航模式的,是选择Master-Detail Application,在下一个界面选择为iphone生成的。在XCode4.2以前的版本是选择Navigation-based Application,这里是只有为iphone生成的,不能选择为ipad生成的。
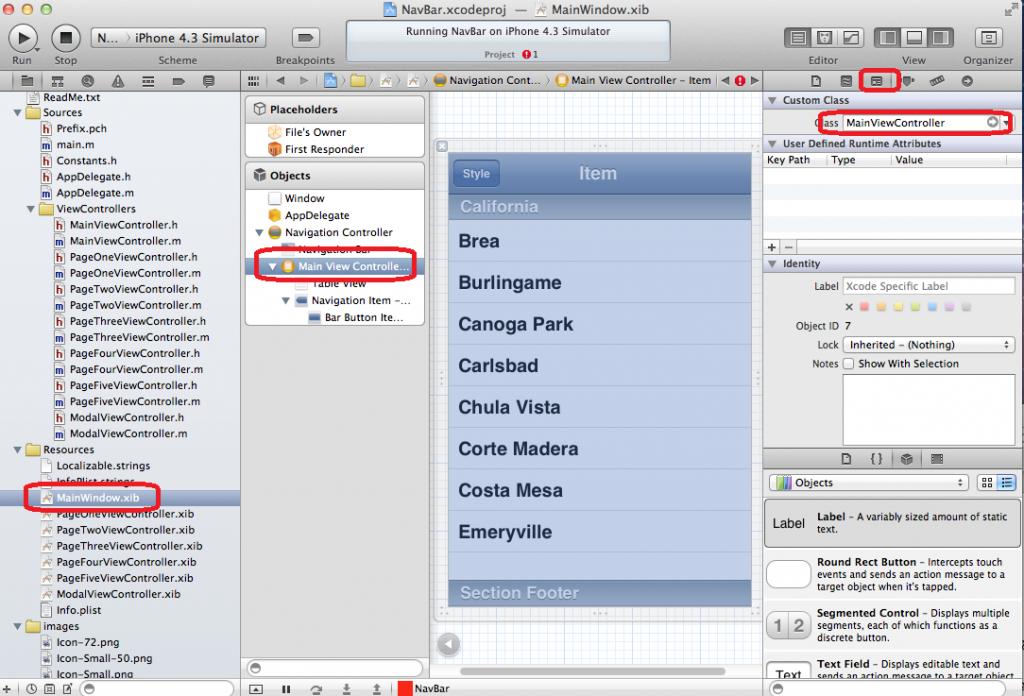
上面的第一个界面的代码是在MainViewController.h中,如果你不知道这个是如何联系起来的,请看下图,具体细节不解释了,在前面的文章中有提到的。
每一个导航模式中的view隐含的有一个导航区,就是view的上部,这里有四个部分,分别是本导航页的右button,back button, title, 左button,其中左button的位置和back button是重叠的,在导航的第一个view上是没有back button的,后面的view缺省有back button,当然,你可以使用代码隐藏这个back button.在任何界面上,缺省都没有左button,右button,和title,你需要自己手动设置。
在主view上,我们可以看到,左button是通过xib加入的。右button是通过代码加入的。
确切的说,左右和back button都不是一个普通的button,是一个button item,简化过的。
我们先看看左button的响应函数。
- (IBAction)styleAction:(id)sender
{
UIActionSheet *styleAlert = [[UIActionSheetalloc]
initWithTitle:@"Choose a UIBarStyle:"
delegate:selfcancelButtonTitle:@"Cancel"
destructiveButtonTitle:nil
otherButtonTitles:@"Default",
@"BlackOpaque",
@"BlackTranslucent",
nil,
nil];
// use the same style as the nav bar
styleAlert.actionSheetStyle =self.navigationController.navigationBar.barStyle;
[styleAlertshowInView:self.view];
[styleAlertrelease];
}
这里点中左button后的界面如下:
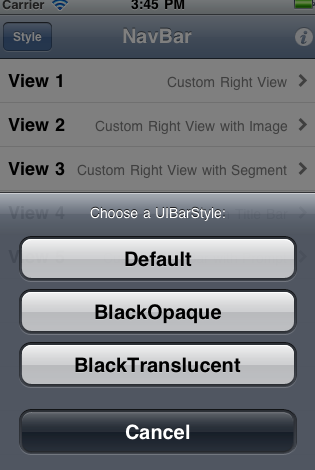
关于Action Sheet的用法这里不再分析,你可以参考我在UICatalog中的分析。
这个是选择导航栏的样式,共有三种,你可以每一个选择一下试试。这里需要说明的地方是,Xcode会在
styleAlert.actionSheetStyle =self.navigationController.navigationBar.barStyle;
这一行上面给出一个warning 或者error(取决你的设置,但是都不影响程序的运行),因为action sheet的actionSheetStyle和导航的barStyle不是同一个定义,它们是不同的枚举类型,大家知道枚举都是从0开始编码的整数,而且都是有三种类型,所以可以直接使用等号,但是会有一个警告。
在action sheet 的响应函数
- (void)actionSheet:(UIActionSheet *)modalView clickedButtonAtIndex:(NSInteger)buttonIndex
中,我们需要注意的是类似这样的代码。
[UIApplicationsharedApplication].statusBarStyle
=UIStatusBarStyleDefault;
这个代码是使系统状态栏的样式和导航具有相同的样式。
下面我们开始分析viewDidLoad函数,
- (void)viewDidLoad
{
// Make the title of this page the same as the title of this app
self.title
= [[[NSBundle mainBundle]infoDictionary]
objectForKey:@"CFBundleName"];
上面的这行代码就是设置导航区的title,你可以自定义为一个view,这样可以放一个图片在上面。
self.menuList
= [NSMutableArray array];
// We will lazily create our view controllers as the user requests them (at a later time),
// but for now we will encase each title an explanation text into a NSDictionary and add it to a mutable array.
// This dictionary will be used by our table view data source to populate the text in each cell.
//
// When it comes time to create the corresponding view controller we will replace each NSDictionary.
//
// If you want to add more pages, simply call "addObject" on "menuList"
// with an additional NSDictionary. Note we use NSLocalizedString to load a localized version of its title.
if (!pageNames)
{
pageNames = [[NSArrayalloc]
initWithObjects:@"PageOne",@"PageTwo",
@"PageThree",@"PageFour",
@"PageFive",nil];
}
这里注意很多人在使用initWithObjects初始化一个NSArray的时候,会和initWithObject搞混。没有s的表示使用一个指针初始化NSArray,初始化后,这个NSArray的实例只有一个数据,所以在调用没有s的函数的时候是不能以nil结束的,但是有s的就不一样了,哪怕只有一个数据,或者没有数据,必须使用一个nil结束。
for (NSString *pageName
in pageNames)
{
[self.menuListaddObject:[NSMutableDictionarydictionaryWithObjectsAndKeys:
NSLocalizedString([pageName
stringByAppendingString:@"Title"],
@""), kTitleKey,
NSLocalizedString([pageName
stringByAppendingString:@"Explain"],
@""), kDetailKey,
nil]];
}
上面的代码使用了for in又叫for each循环,如果有问题,请参考objective-c部分的说明。
上面的代码循环部分就不解释了,你可能看起来有一些吃力,请参考我前面的文章关于国际化的部分,然后打开Localizable.strings这个文件,你一目了然了。
// Create a final modal view controller
UIButton* modalViewButton = [UIButtonbuttonWithType:UIButtonTypeInfoLight];
[modalViewButtonaddTarget:selfaction:@selector(modalViewAction:)forControlEvents:UIControlEventTouchUpInside];
上面生成一个UIButton的实例,作为导航区的右button使用。
UIBarButtonItem *modalBarButtonItem = [[UIBarButtonItemalloc]
initWithCustomView:modalViewButton];
self.navigationItem.rightBarButtonItem
= modalBarButtonItem;
[modalBarButtonItemrelease];
这里就是使用代码添加右button的方法,很简单,但是记得需要调用[modalBarButtonItemrelease]释放UIBarButtonItem的实例,你可能会问,为何不释放UIButton的实例,因为创建的方式不同,modalBarButtonItem是使用alloc的方式,表示你自己管理内存,modalViewButton使用buttonWithType的方式,没有调用alloc,所以不需要自己释放,其实它是在自动内存释放池中。
[self.myTableViewreloadData];
}
下面一个要分析的函数是
- (void)tableView:(UITableView *)tableView didSelectRowAtIndexPath:(NSIndexPath *)indexPath
这个函数在table view上一行被点中的时候调用。
NSMutableDictionary *rowData = [self.menuListobjectAtIndex:indexPath.row];
UIViewController *targetViewController = [rowDataobjectForKey:kViewControllerKey];
if (!targetViewController)
{
// The view controller has not been created yet, create it and set it to our menuList array
NSString *viewControllerName = [[pageNamesobjectAtIndex:indexPath.row]stringByAppendingString:@"ViewController"];
得到目标viewcontroller的名称
targetViewController = [[NSClassFromString(viewControllerName)alloc]
initWithNibName:viewControllerNamebundle:nil];
这里是Objective-C的运行期(Run Time)的一个特性,你可以通过一个类名来生成一个类。
[rowData
setValue:targetViewController forKey:kViewControllerKey];
[targetViewControllerrelease];
}
[self.navigationControllerpushViewController:targetViewController
animated:YES];
导航到某个view controller,导航是一个栈的方式,所以到下一级就是push的方式。
最后分析的函数是
- (IBAction)modalViewAction:(id)sender
这个函数如下:
if (self.myModalViewController
== nil)
self.myModalViewController = [[[ModalViewControlleralloc]
initWithNibName:
NSStringFromClass([ModalViewControllerclass])
bundle:nil]autorelease];
[self.navigationControllerpresentModalViewController:self.myModalViewControlleranimated:YES];
presentModalViewController:animated:是使一个viewcontroller从下面升上来。
2.PageOneViewController
- (void)viewDidLoad
{
// Add our custom add button as the nav bar's custom right view
UIBarButtonItem *addButton = [[[UIBarButtonItemalloc]
initWithTitle:NSLocalizedString(@"AddTitle",@"")
style:UIBarButtonItemStyleBordered
target:self
action:@selector(addAction:)]autorelease];
self.navigationItem.rightBarButtonItem
= addButton;
加入一个右button
}
3.PageTwoViewContrller
- (void)viewDidLoad
{
// add our custom image button as the nav bar's custom right view
UIBarButtonItem *addButton = [[UIBarButtonItemalloc]
initWithImage:[UIImageimageNamed:@"email.png"]
style:UIBarButtonItemStyleBorderedtarget:selfaction:@selector(action:)];
self.navigationItem.rightBarButtonItem
= addButton;
[addButtonrelease];
加入一个右button,和第一个不同的是,使用一个png图片来作为button的显示内容。
}
4.PageThreeViewController
- (void)viewDidLoad
{
// "Segmented" control to the right
UISegmentedControl *segmentedControl = [[UISegmentedControlalloc]
initWithItems:
[NSArrayarrayWithObjects:
[UIImageimageNamed:@"up.png"],
[UIImageimageNamed:@"down.png"],
nil]];
[segmentedControladdTarget:selfaction:@selector(segmentAction:)forControlEvents:UIControlEventValueChanged];
segmentedControl.frame =CGRectMake(0, 0, 90,
kCustomButtonHeight);
segmentedControl.segmentedControlStyle =UISegmentedControlStyleBar;
segmentedControl.momentary =YES;
defaultTintColor = [segmentedControl.tintColorretain];
// keep track of this for later
UIBarButtonItem *segmentBarItem = [[UIBarButtonItemalloc]
initWithCustomView:segmentedControl];
[segmentedControlrelease];
self.navigationItem.rightBarButtonItem
= segmentBarItem;
[segmentBarItem
release];
上面的代码初始化右button,使用一个segmented controller,这里有两个部分,使用两个图片。很有趣,有时候我们会加入两个button,但是这个代码更简洁。关于segmented controller不是本文分析的重点,你可以在UICatalog中看到。
}
- (void)viewWillAppear:(BOOL)animated
{
UISegmentedControl *segmentedControl = (UISegmentedControl
*)self.navigationItem.rightBarButtonItem.customView;
// Before we show this view make sure the segmentedControl matches the nav bar style
if (self.navigationController.navigationBar.barStyle
== UIBarStyleBlackTranslucent ||
self.navigationController.navigationBar.barStyle
== UIBarStyleBlackOpaque)
segmentedControl.tintColor = [UIColordarkGrayColor];
else
segmentedControl.tintColor =defaultTintColor;
是的segmented controller的背景颜色合适。
}
5.PageFourViewController
这个类使用的技术和上面一个相同,不再多说。
6. PageFiveViewController
这个类使用的技术和上面一个相同,只有以下需要说明的。
- (id)initWithNibName:(NSString *)nibNameOrNil bundle:(NSBundle *)nibBundleOrNil
{
if (!(self = [superinitWithNibName:nibNameOrNil
bundle:nibBundleOrNil]));
上面这个地方有一个编译问题,有两种方式解决,一个就是加入一个return nil;,另一个就是不是用if.
self.title =NSLocalizedString(@"PageFiveTitle",@"");
self.navigationItem.prompt
=NSLocalizedString(@"Please select the appropriate media type:",@"Page Five Prompt");
使得导航区变得更宽,多显示一个文本区。
returnself;
}
7.个性化标题栏
假如我们有一个图片如下,并且图片的名字为1.png
那么我们如何使用这个图片,而不是一个简单的文本来显示在标题栏上那?
首先把图片加入工程,然后可把下面的代码加入到合适的地方。比如viewDidLoad函数中。
UIImageView *fancyImageTitleView = [[UIImageView
alloc] initWithImage:[UIImage
imageNamed:@"1.png"]];
self.navigationItem.titleView = fancyImageTitleView;
[fancyImageTitleView
release];
8.使用代码生成一个导航模式的view controller.
如果你使用xcode 4.2,你就会发现工程类型为master-detail application在为iphone生成的工程就是一个导航模式的,这里生成的方式已经发生改变,不是使用xib的方式,而是使用代码的方式,
代码如下:
tcMasterViewController *masterViewController = [[[tcMasterViewController
alloc] initWithNibName:@"tcMasterViewController"
bundle:nil]
autorelease];
self.navigationController = [[[UINavigationController
alloc] initWithRootViewController:masterViewController]
autorelease];
self.window.rootViewController =
self.navigationController;
分享到:


相关推荐
前端开源库-navbar.jsnavbar.js,一个本地javascript的快速站点导航。
reponsive-navbar-javascript-源码.rar
Angular-angular2-bs4-navbar.zip,一个带有bootstrap4导航栏的angular2应用程序,使用angular2的路由器v3进行路由,遵循angular2 bootstrap4导航栏的角度样式指南,Angularjs于2016年发布,是Angularjs的重写版。...
小程序左上角胶囊:获取手机状态栏高度我们可以使用wx.getSystemInfo这个接口,来获取手机状态栏的高度,至于同步异步; 小程序底部弹框的两种方式;
//NavBar高度 #define NavigationBar_HEIGHT 44 //获取屏幕 宽度、高度 #define SCREEN_WIDTH ([UIScreen mainScreen].bounds.size.width) #define SCREEN_HEIGHT ([UIScreen mainScreen].bounds.size.height) //--...
mint-ui-navbar示例
react-native-detect-navbar-android 检测Android设备的软导航栏,以便您知道哪个具有物理键(Home,Back,Menu),而哪些没有。 注意:该项目仅适用于Android,如果您使用它来检测软键是否被隐藏,它将无法正常...
uni-app 自定义导航栏
小程序自定义导航栏的写法封装成组件形式调用,适配APP和小程序,scroll-view组件的应用解决页面局部滚动的效果。
IOS滑动切换Navbar控制器.zip
stickyNavbar.js 是个 jQuery 插件,滚动页面的时候帮用户固定导航条到浏览器窗口的顶部。用户还可以添加自己喜欢的 jQuery 效果或者是迷人的 CSS 库来美化导航。在线演示 标签:stickyNavbar
horizontal-icon-navbar.html sensitive-section-nav.html simple-header-section.html simple-html-book-page.html simple-webpage-layout.html vertical-icon-navbar.html gp-resource-pg.html #### ...
horizontal-icon-navbar.html sensitive-section-nav.html simple-form-validation-php.html 简单形式验证-php.php simple-header-section.html simple-html-book-page.html simple-webpage-layout.html ...
bootstrapt-navbar-grid
小程序自定义导航栏,左上角胶囊按钮返回|首页详解详情介绍地址:https://juejin.im/post/5d0219536fb9a07ef06f8eab主要API获取设备信息wx.getSystemInfo获得胶囊按钮坐标信息wx.getMenuButtonBoundingClientRect...
react-responsive-animate-navbar ()只是一个简单、灵活且完全可定制的响应式导航栏组件。桌面演示:响应式演示:安装npm install --save react-responsive-animate-navbar用法 import React from "react" ;import ...
C3P0地址:https://sourceforge.net/projects/c3p0/?source=navbar C3P0是一个开源的连接池。Hibernate框架,默认推荐使用C3P0作为连接池实现。 C3P0的jar包:c3p0-0.9.1.2.jar
react-bs-navbar 使用React的Bootstrap 3的Navbar组件用法 React . render ( React . createElement ( Navbar . Navbar , menu_content ) , document . getElementById ( 'mount_point' )) ;菜单内容格式菜单的内容...
通过bootstrap文档对导航条样式的设置发现,其实本身是有一个类似于主题的...具体代码参考navbar-default实现即可 以上所述是小编给大家介绍的通过学习bootstrop导航条学会修改bootstrop颜色基调,希望对大家有所帮助!
我们可以使用 .navbar 类来创建一个标准的导航栏,后面紧跟: .navbar-expand-xl|lg|md|sm 类来创建响应式的导航栏 (大屏幕水平铺开,小屏幕垂直堆叠)。 导航栏上的选项可以使用 元素并添加 class=”navbar-nav” ...